Looking for an easy creative project? Follow our DIY post to make your own flower box. You’ll get tips and ideas on how to create your own planter to decorate your home for summer. There’s nothing better than a floor planter arrangement to decorate the entryway or the pool! Have fun creating a potted flower arrangement in just a few steps, read more to find out what you’ll need and how to make it.

Step 1: choose a pot and stabilize it
Before you create your artificial planter arrangement, get an outdoor pot of your choice that is preferably weather resistant. For example, fiberglass, plastic or terra cotta pots. These will be better adapted to outdoor conditions. Once you have selected your pot, it is important to add weight to it with a bag of rocks, old books or any other object that can be used to add weight to your planter. This step will prevent your pot from shifting or falling over due to the wind.
Step 2: fill your planter with recycled materials
Once the weight is at the bottom of the pot, you can then place recycled materials or a block of foam inside. This step is used to fill the empty space inside the pot. Take advantage of this step to put cardboard, paper or other recyclable materials in the pot to give it a second life. It’s economical and eco friendly!
Step 3: create a base with foam blocks
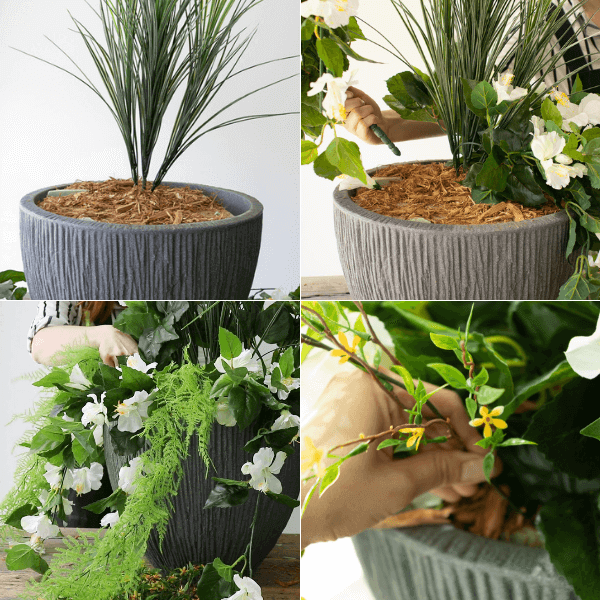
In order to secure your flowers and stems of greenery, it is important to create a base with foam blocks. Place it on top of your recycled materials to cover the entire surface of the pot. This step will keep your stems in place.
Good to know: the oasis block from Décors Véronneau is made for outdoor use and does not absorb water.
Step 4 : cover your pot with mulch
For the final look, camouflage the foam with decorative mulch available in hardware stores. Use your hands to spread the mulch over the foam and smooth it out.
Step 5: assemble the floral arrangement
You’re now ready to start your flower arrangement with faux flowers !
Insert the tall green grass in the center of the pot to give height to your arrangement
- Stick your white hibiscus stems (also known as the complementary plant) on opposite sides, spreading the longer ones around the planter
- Cut the greenery (also known as the hanging plant) into small stems, then insert them all around the planter
- Unfold the hibiscus flowers so that they look full
- Cut the yellow flower stems (also called filler plant) into small clusters and insert them into the exposed holes
Step 6 : the final touch !
Once the stems are securely in place in the pot, you can make the finishing touches, by bending the hanging hibiscus stems for more realism and placing the flowers in such a way that there are no empty spaces.
All that’s left to do is put your artificial planter outside!